DaVinci Resolve is a powerful tool for video editing, recognized for its robust features and flexibility. Did you know you can automate your workflow using the DaVinci Resolve API? In this blog post, we’ll explore how to create a new project and timeline using Python. This will save you time and streamline your editing process, especially when handling multiple projects. This should serve as the foundation to much more complex functionality. We all have to start somewhere, right?
Prerequisites
Before diving into the code, ensure you have the following:
- The latest version of DaVinci Resolve(19 or higher) installed on your machine.
- Python installed (version 3.x recommended).
- Access to the DaVinci Resolve API documentation or even better, to the DaVinci Resolve API Cheat Sheet.
Setting Up
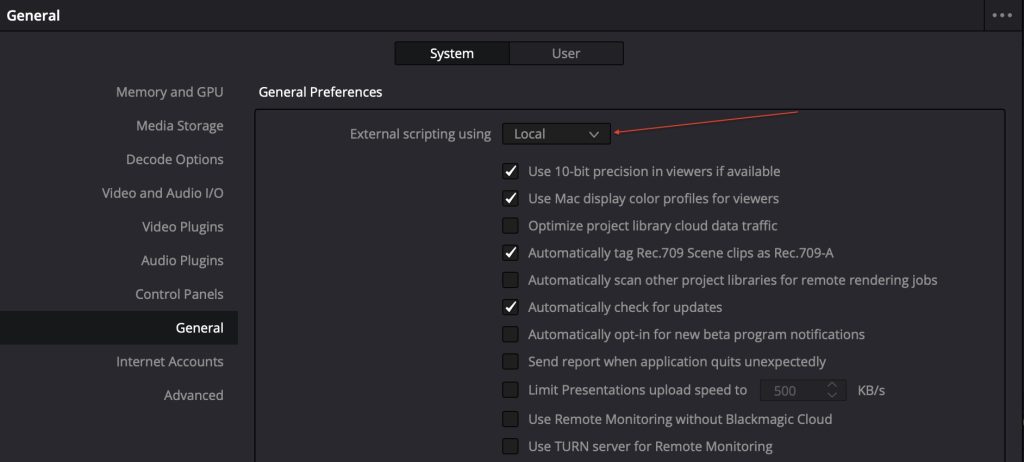
First, you need to confirm that the DaVinci Resolve API is enabled. You can do this from the Workspace menu in DaVinci Resolve:
- Go to Preferences -> General -> External Scripting Using.
- Ensure that Local is checked.
Next, confirm that you have the DaVinciResolveScript module installed and working properly.
Simply make sure that you have the following lines in THE PATH of your computer (normally you would set up this in your .bash_profile or .bashrc files if you are on a MAC)
					export RESOLVE_SCRIPT_API="/Library/Application Support/Blackmagic Design/DaVinci Resolve/Developer/Scripting"
export RESOLVE_SCRIPT_LIB="/Applications/DaVinci Resolve/DaVinci Resolve.app/Contents/Libraries/Fusion/fusionscript.so"
export PYTHONPATH="$PYTHONPATH:$RESOLVE_SCRIPT_API/Modules/"
Your first script
The first thing to do is open up your favorite text editor, I recommend something like Sublime Text 3 or Visual Studio Code, but any good editor is sufficient. As you get used to coding the API you probably want to chose an editor that provides syntax highlighting and completions for python.
We are going to start by adding the necessary required modules at the top of our script.
					#!/usr/bin/env python3

# Import the APIs
import DaVinciResolveScript as dvr_script

# Let's get the resolve object
resolve = dvr_script.scriptapp("Resolve")
Creating a New Project
Once connected, you can create a new project using the following code:
					# Get the projectManager
projectManager = resolve.GetProjectManager()

# Create the project
t1 = projectManager.CreateProject('T1')
Creating a New Timeline
Creating a new timeline within the newly created project involves a few more steps. You first need to fetch the project and then create a timeline:
					# 1. Get current project
project = projectManager.GetCurrentProject()

# 2. Get the mediaPool object
mediaPool = project.GetMediaPool()

# 3. Create empty timeline
tl = mediaPool.CreateEmptyTimeline('TimelineX')
With this script, you’ve programmatically created a new project and timeline in DaVinci Resolve using Python. This is just the beginning of what you can do with the DaVinci Resolve API. Automating your workflow can drastically improve efficiency, especially in professional settings. Feel free to explore further possibilities with the API, such as adding media to your timeline, rendering projects, and more!
Further Reading and Resources